Teachers Learn guides
Other guides
PLAGIARISM DETECTION TURNITIN INTEGRITY
Xamk has a plagiarism detection service called Turnitin Integrity. Teachers can use Turnitin in Wihi and the course platforms in the Learn environment in assignments, discussion forums, workshops and quiz.
The student will be notified of using the plagiarism detection service within the activity. The student must accept the Turnitin EULA at the time of the first check-in through the service. The teacher must also accept the access agreement on the first occasion in order to see the student's returned inspection report.
Tutustu palvelun ominaisuuksiin ja käyttöönottoon Plagiaatintunnistusjärjestelmä Turnitin tutuksi 2022 -webinaarin tallenteen (kesto 15:10) avulla
Learn - Peppi integration
The integration between the Xamk Learn and Peppi environments enables a two-way exchange of data between the systems. The integration is teacher-driven and enables the teacher to create a new course platform in the Learn environment via the Oppimisympäristöt tab of the Peppi implementation.
For course platforms that are targeted at CampusOnline students or where the majority of students come via CampusOnline, it is not recommended to use the Peppi integration.
HOW TO USE GROUPS IN PEPPI-INTEGRATED COURSES
Course platforms created through the Peppi implementation contains groups created by the Peppi connection. They affect how the course teacher can use groups in the course platform. A student cannot be a member of two groups at the same time if both groups are active in the same activity. This is an issue that teacher must understand when working with groups in the Peppi integrated course platforms.
The solution is to use grouping in activity to determine which of the groups in the course platform are active and which are not.
Course Completion tracking
The teacher can define completion conditions for the course activities. Students' progress can be monitored in the course based either on the completion of activities or on the Marks as done made by the student.
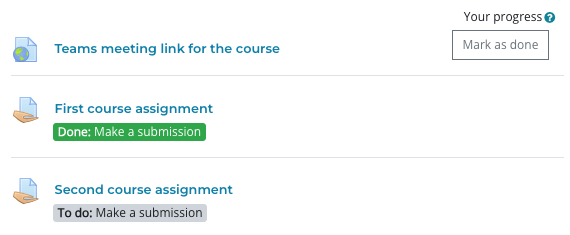
The conditions for completion tracking are visible to the student under the activity and in the Completion progress block, if it is in the course. Mark as done activities are those for which the student marks the completion himself/herself. Otherwise, the completion mark is given when the specified conditions are met.
In the Completion progress block, colours are used to indicate the stage of completion of the course. The teacher can individually select the activities that appear in the block. A course may have more activities that use completion tracking than those that appear in the block. Activities marked in blue are not yet completed and activities marked in yellow represent incomplete completion. Green indicates successful completion, while red indicates unsuccessful completion.
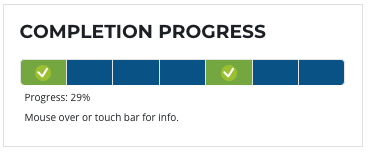
You can also see your personal completion progress on the Dashboard, if your courses has a course completion tracking activated. The Dashboard shows the percentage of all activities tracked in the course and it may differ from the percentage shown in the Completion progress block of the course platform.

How to use groups in the course
Groups can be used to form small study groups of course platform participants, for example for group assignments or discussions. If the course platform has been created through the Peppi, the integration will also create two small groups on the course platform. These small groups cannot be deleted or changed.
An individual student can be a member of more than one group at the same time and groups can be activated and deactivated through groupings. The groups are created and managed via the Groups view in the gear menu.
Lue lisää ryhmien luomisesta, ryhmittelystä ja näiden hyödyntämisestä aktiviteeteissa Moodle Opettajan opas - Ryhmien ja ryhmittelyjen idea -sivulta.
How to activate Panopto video service on the course
The Panopto video service enables the teacher to add Panopto recordings to the course platform and students' are able to submit video and audio assignments to Panopto. Students cannot independently submit recordings to Panopto, so the return of recordings is done through the course platform. The teacher has to link the course platform to the Panopto service before the students are able to submit assignments to Panopto.
How to Add the Panopto Block to Moodle Courses
Adding the Kaakkuri resource favourite list to the course
The teacher can create a list of resources supporting the course in the Kaakkuri service and share it with students on the course platform. The list can include all the resources (books, e-books, articles, etc.) that can be searched electronically through the Kaakkuri service.
Favourites lists can be created in the Saved Items section of Kaakkuri when you are logged in to the service. You can add a new favourites list with the Create a List option. In order to share a favourite list in the Learn environment on the course platform, the list must be made Public, so that it has its own web address. Viewing a public favourites list does not require a login to the Kaakkuri service, but to lend material, for example, the student must be logged in to Kaakkuri.
H5P
With H5P you can create interactive activities and tasks for your course. They are suitable for activating the student and enrich the course content. The H5P idea is that the student can receive immediate feedback on the activity. The H5P activities are well suited for independent practice and revision.
Please note that there is no possibility to limit how many times a H5P activity can be completed. The student can try to complete it as many times as he or she likes. H5P allows you to create the learning activities, materials and combinations of these.
Familiarize yourself with the H5P at the H5P.org
Setting an extended time to quiz or grand a retake
The teacher can define to a student personal settings for the quiz that differs from the general settings for the quiz, e.g. in terms of date, quiz attempt time or number of times the quiz is taken. However, the quiz will be conducted with the same settings in all other respects, i.e. the student will have to answer the same questions and quiz will be graded under the same conditions as other student's attempts.
How to add a user override to student in the quiz:
- From the main page of the course platform, click on the name of the quiz activity to go to the quiz overview view where you can see the instructions and general timing of the quiz.
- In this view, open the gear menu and choose 'User overrides' and then press 'Add user override' button.
- The quiz exception is always personal, so first select the student for whom the exception is intended in the Override user field.
- By default, the general settings of the quiz time is copied to user override. The teacher can change both the start and end time of the quiz, as well as the attempt time limit. If the student is retaking the quiz, remember that the number of attempts must be the number of previous attempts + 1. If the student has already attempted the quiz once, the minimum number of attempts for the retake must be 2 (of which the first has already been used).

How to enable the Participants view for students in a course platform
As a course teacher you can enable the Participants view for your course platform students. The change will only affect the course platform where the change is made and it doesn’t inherit to the possible copies of the course platform.
How to enable the Participants view
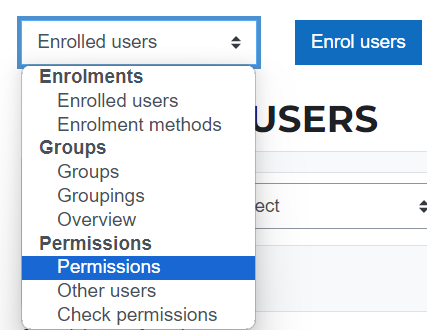
- Go to the Participants view and choose Permissions from the top left corner menu.
- In the Permissions in Course view choose “Student” from the Advanced role override menu.

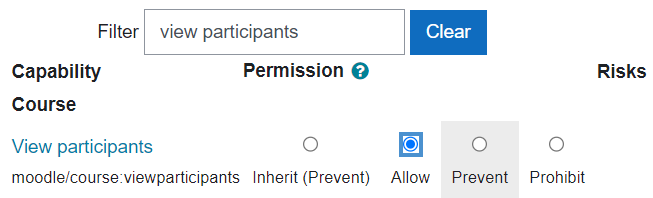
- Type “view participants” in the Filter text field to narrow the list of capabilities to only one result.
- Change the Permission to “Allow” and press the Save changes button.
- Now there should be also the “Student” role in the Roles with permission list to indicate that the change is made.

- You can return to the course and test out the change by switching your role temporary to a student. The Participants view should be visible in the same way as in the teacher role.